
This article gives some useful tips and addresses some common issues found when building your first quadrotor. It does not try to cover everything, but it does try to provide a start point where you could start your amazing adventure.
In this article, a quadrotor consist of three main parts: airframe, propulsion system, command, and control system. Note that some these parts are not necessary. For example, you don’t need a GPS and Ground Control Station and radio telemetry to fly your quadrotor manually.
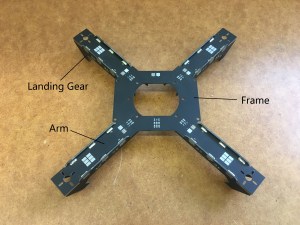
Airframe: including fuselage, arms, landing gear;
Propulsion system: including battery, motor, ESC (electric speed controller), propeller;

Command and Control system: including RC transmitter, RC receiver, GPS receiver, autopilot, radio telemetry, ground control station(computer running software to control UAV);

Step 1: Choose quadrotors’ components based on requirements
The first step is to determine the key components of quadrotor. You need to know what the quadrotor for, so you could determine the following questions. For example, if you only want to fly your quadrotor manually for fun, you don’t need to spend more money on a big and high-performance PIXHAWK, a CC3D will do the trick.
1) Type of autopilot
There is a plenty good value autopilot out there. It really depends on the user’s needs and budget. There is an article online which compares all the popular autopilot:
http://www.droneybee.com/best-flight-controller-quadcopter/
We use pixhawk in this article. When you buy your autopilot, it usually comes with GPS receiver and radio telemetry, sometimes also a power distribute board (depend on your autopilot).
2) Size and weight of quadrotors
For starters, small quadrotor (size 250) is recommended for cost and safety issue. The quadrotor had better be under 2kg in order to meet regulation when you try to fly your quadrotor in public area. Make sure that all the components have enough room on the fuselage.
3) Configuration and strength of your airframe
Make sure your configuration is supported by your autopilot. Go for common configuration, such as “X” or “+” type, if you are not sure which kind of configuration you should use.
Pay attention to the strength of the fuselage. If the fuselage is not strong enough, when all the motors are on, there will be intense vibration which could pose a difficult problem for damping your flight controller. If there is not enough damping for your autopilot, gyroscope’s data will be a mess, which could bring chaos.
4) Propulsion system
Choose propulsion system based on the performance of quadrotor. Usually, the max thrust provided by all the motors is two times the total weight of the quadrotor itself. Motor’s specification will show its max thrust with which type of propeller and how much its burst current is. Based on the max continuous current, burst current and motor type to choose your ESC. It depends on the motor, most motors support a 3S or 4S battery and a relatively high C rating for power supply. For size 250 quadrotorsa 3S 1300mAh, 45C battery works fine. You could estimate your flight time by calculating the hovering current and capacity of the battery. In fact, there is a lot more information about motors, battery, and ESC, and they deserve their own articles, for now, it is good enough to move on.
There is a good article about the battery:
http://www.dronetrest.com/t/lipo-batteries-how-to-choose-the-best-battery-for-your-drone/1277
Note that there is a bunch of airframes and propulsion kits online. If you don’t have a special payload to carry, go for a pre-made airframe and it will save you a lot of time and money. The good thing of using propulsion kit is that you don’t need to do the calculation, there are enough margins as long as the airframe size matches (for example, size 250 or size 450, meaning the diagonal length of the quadrotor). There are also some DIY examples you can find on this website: http://ardupilot.org/copter/docs/common-common-airframe-builds.html.
In our lab, the frame kit and propulsion kit are recommended for first-time builders.
Frame kit
https://hobbyking.com/en_us/h-king-color-250-white.html
Propulsion Kit
https://hobbyking.com/en_us/ldpower-250-race-spec-1806-2280kv-d200-5×3-4-pack.html
5) Choose RC transmitter and RC receiver
One of the most important thing for the RC transmitter and RC receiver is that receivers should be compatible with the transmitter, usually they are the same brand. Should be careful of the protocol between transmitter and receivers. Note that you need to bind the receiver to transmitter before they could be used. Please refer to your transmitter manual on how to do this.
There is an article about how to choose your transmitters and receivers:
https://oscarliang.com/choose-rc-transmitter-quadcopter/
Students who have access to our lab could borrow RC transmitters and receivers.
6) Ground control station
You could fly manually without a ground control station and radio telemetry, but if you would like to fly autonomously, you need one. Usually a laptop or an iPad, sometimes a phone could do the jobs.
Step 2: Assemble your Quadrotor
Since you have got all your key components, it is time to put them together.
Thanks to Jethro Hazelhurst. (http://ardupilot.org/copter/docs/advanced-pixhawk-quadcopter-wiring-chart.html)
A great graph illustrates how to connect pixhawk hardware is below:

Note:
1) The 4 in 1 ESC, gimbal, battery warning and camera are not necessary components for your quadrotor, they are used for better performance or extra functionality. You could still use one to one ESC like most DIY quadrotors do;
2) The +5v power line on the pixhawk connector is always on the right side if you accidentally connect it in the wrong direction you could burn your flight controller;
3) The receiver is a PPM type in the graph, so the wiring is a little complicated. If you use a sbus type receiver, you could directly connect to pixhawk;(Note it is still connected to RCIN, the sbus indicator on the pixhawk is for sbus output);
4) The orientation of motor’s rotation is crucial, if you find motor spinning in the wrong direction, simply exchange any two motors’s power line connected to the ESC, the problem will be fixed; during this process, do not mount any propellers, put some tape on the motor to observe motors’ orientation;
5) When you mount your motors on the airframe, be careful of screws, they should not touch any coil of the motor. Due to the structure of BLDC motor, if you use a long screw it is likely that you could shortcut the motor, so be aware of it;
6) There had better be a damping device between pixhawk and the airframe and pixhawk had better be located at CG area;
7) Calibrate all your ESCs, you could do it in the QGround Control; Note once you change your ESC, you have to calibrate your ESC again, or they won’t work properly;
8) You may need to do some soldering during this process, there is a number of videos on YouTube on how to solder certain type connector;
Step 3: Set up your quadrotor with PX4 autopilot software
The hardware of your quadrotor is all done. It is time to look at the software part. There is an anther detailed tutorial on how to do this on our website.
Look at https://uav-lab.org/2016/07/27/px4-research-log1-how-to-flash-px4-firmware/
Step 4: Test flight
Now the quadrotor is ready to for its first flight.
Before you test it, beware of the following things:
1) Find an empty ground and keep it away from people;
2) If your quadrotor fails, do not try to catch it, just let it fall;
3) Be aware of the propellers;
4) Setup an RTL mode, in case that you are panic when you are flying, it could help you to land your quadrotor safely;
5) During the flight, you could fine tune the PID parameters;
6) Have a battery alarm or watch your battery on ground control station;
7) Have a checklist to make sure you have everything you need before your test flight;
Now, enjoy your adventure.


